

If you like tinkering with the Raspberry Pi or other single-board computers such as the Banana Pi, Odroid and the like, you keep running into SSH. The images made for these mini computers are usually based on Linux and therefore mostly come with SSH access built in. In everyday tinkering, however, you set these machines up from scratch again and again, or you quickly pull the power plug to “just” restart the device. That throws SSH off balance: after installing a new system, the stored SSH key no longer matches, or the SSH client hangs when you suddenly pull the plug. You can solve these problems the quick and dirty way, but there is always a clean way, too.
When establishing a connection via SSH, the SSH client usually stores the public SSH key of the remote system together with its hostname and IP address in the file ~/.ssh/known_hosts in the current user’s home directory on the client machine. Among other things, this is done to prevent man-in-the-middle attacks, in which an attacker pretends to be the target machine in order to phish your login credentials. However, this security measure also kicks in when there is no threat at all: for example, when you set up a Pi from scratch and try to log in via SSH again. In such a case, SSH reports WARNING: REMOTE HOST IDENTIFICATION HAS CHANGED in big letters.
SSH after reinstalling the system
$ grep 192.168.111.100 ~/.ssh/known_hosts
raspberrypi,192.168.111.100 ecdsa-sha2-nistp256 AAAAE2...ABBBBqf
$ ssh pi@192.168.111.100
@@@@@@@@@@@@@@@@@@@@@@@@@@@@@@@@@@@@@@@@@@@@@@@@@@@@@@@@@@@
@    WARNING: REMOTE HOST IDENTIFICATION HAS CHANGED!     @
@@@@@@@@@@@@@@@@@@@@@@@@@@@@@@@@@@@@@@@@@@@@@@@@@@@@@@@@@@@
IT IS POSSIBLE THAT SOMEONE IS DOING SOMETHING NASTY!
Someone could be eavesdropping on you right now (man-in-the-middle attack)!
It is also possible that a host key has just been changed.
The fingerprint for the ECDSA key sent by the remote host is
SHA256:6rR+0/i3KnPLds3EuGkfWiudIgu8VMpe1xq+X3I3yNM.
Please contact your system administrator.
Add correct host key in /home/toff/.ssh/known_hosts to get rid of this message.
Offending ECDSA key in /home/toff/.ssh/known_hosts:10
ECDSA host key for 192.168.111.100 has changed and you have requested strict checking.
Host key verification failed.
You could now open the file ~/.ssh/known_hosts in a text editor and delete the offending line 10 from the list by hand, but there is a better way: with ssh-keygen -R IP-address, you remove the key from the file with a single command, so the next time you connect, you start from scratch – and have to confirm the key just like the very first time you connected to this machine. This also works if you use the hostname instead of the IP address to connect. To be on the safe side, the command copies the old state to ~/.ssh/known_hosts.old in the same directory.
$ ssh-keygen -R 192.168.111.100
# Host 192.168.111.100 found: line 10
/home/toff/.ssh/known_hosts updated.
Original contents retained as /home/toff/.ssh/known_hosts.old
$ ssh pi@192.168.111.100
The authenticity of host 'raspberrypi (192.168.111.100)' can't be established.
ECDSA key fingerprint is SHA256:6rR+0/i3KnPLds3EuGkfWiudIgu8VMpe1xq+X3I3yNM.
Are you sure you want to continue connecting (yes/no)? yes
Warning: Permanently added '192.168.111.100' (ECDSA) to the list of known hosts.
pi@192.168.111.100's password:

The programs included with the Debian GNU/Linux system are free software;
the exact distribution terms for each program are described in the
individual files in /usr/share/doc/*/copyright.

Debian GNU/Linux comes with ABSOLUTELY NO WARRANTY, to the extent
permitted by applicable law.
Last login: Fri Apr 22 08:40:10 2016 from 192.168.178.57
Forcibly terminating an SSH connection
If you are logged in to a remote machine via SSH and shut it down with shutdown, halt or reboot, the system doesn’t kill the SSH connection abruptly. It stops the SSH server cleanly during shutdown, so you end up back in the terminal of the client machine and can keep working in the same terminal window. Now, I – and surely other Pi tinkerers too – like to unplug the Raspberry Pi and plug it back in to restart it quickly and painlessly. This is certainly not ideal for the integrity of the data on the memory card, but if I’m going to set up the system on it from scratch anyway, I don’t much care.
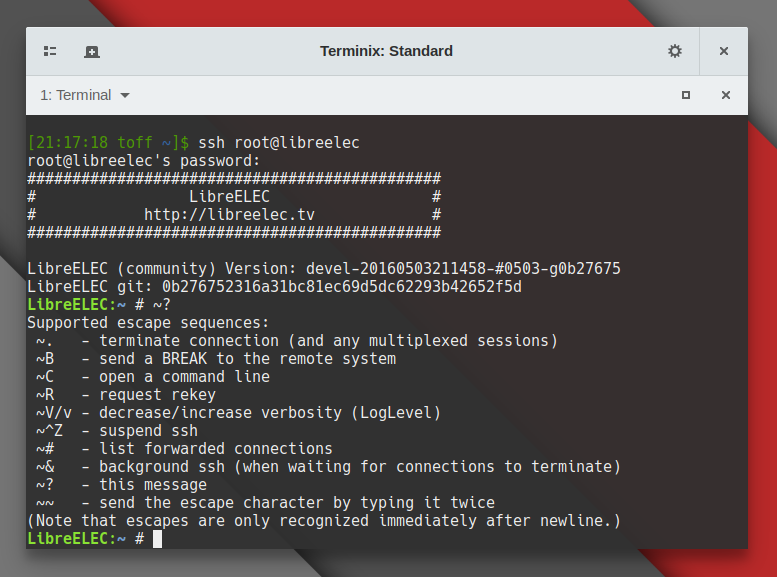
The downside is that SSH usually hangs in the terminal when you do this – after all, you just pulled the chair out from under it. You could now kill the SSH process or close the terminal window and open it again, but there is a clean solution for this situation, too: SSH knows a number of escape sequences that let you manage the current SSH session. You get an overview of the available commands if you type ~? on a new line in the terminal. To be on the safe side, simply press Enter once beforehand.
pi@raspberrypi:~ # ~?
Supported escape sequences:
 ~.   - terminate connection (and any multiplexed sessions)
 ~B   - send a BREAK to the remote system
 ~C   - open a command line
 ~R   - request rekey
 ~V/v - decrease/increase verbosity (LogLevel)
 ~^Z  - suspend ssh
 ~#   - list forwarded connections
 ~&   - background ssh (when waiting for connections to terminate)
 ~?   - this message
 ~~   - send the escape character by typing it twice
(Note that escapes are only recognized immediately after newline.)
The first sequence shown in the help is exactly the function we’re looking for: if you type ~. as text during an SSH session, you terminate the current SSH connection, no matter what. This doesn’t only work with a session that is still active and working (which you could close with exit at any time anyway), but also when, for example, you cut the power to the Pi and nothing happens in the terminal anymore. Here, too, it can help to press Enter once more before the actual command. Otherwise the escape sequence may come to nothing.
Pausing and resuming an SSH connection
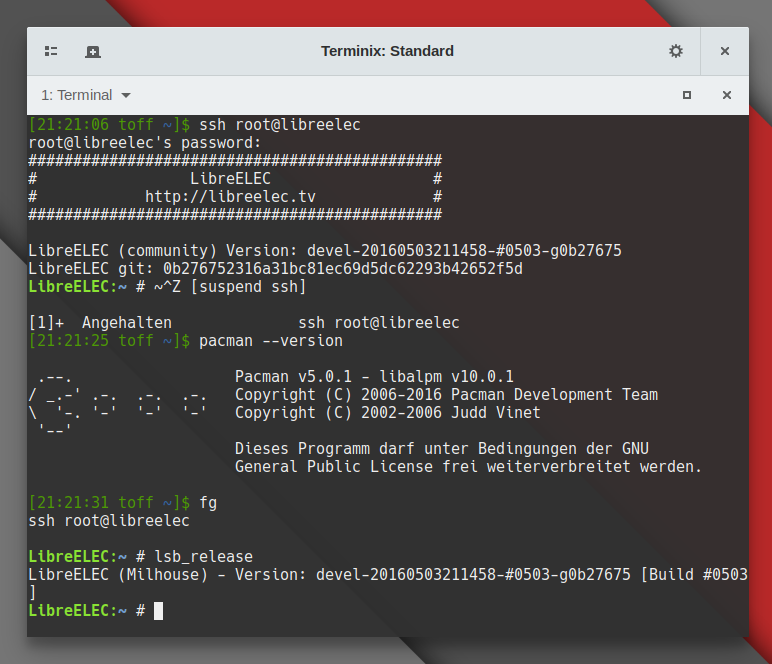
The escape sequences can do other handy things, too. For example, you can suspend an SSH connection and resume it later without having to use a terminal multiplexer such as screen or tmux. If a process takes longer than expected, you can park the connection this way while the process on the remote machine keeps running. Unlike with the two terminal multiplexers mentioned, you don’t have to think ahead that the task might take longer and start them as a precaution. The corresponding sequence is the somewhat cryptic ~^Z, where the caret doesn’t stand for a character but for the Ctrl key. So you type ~ and then press Ctrl+Z. You then land back in the terminal of the machine on which you originally ran ssh. From there, you can pick up the connection again by typing fg and pressing Enter.
If you work on a “truly” remote system over the internet, the connection may well drop. On the one hand, this is because the server terminates the connection after a period of inactivity; on the other hand, your own network infrastructure (read: the router) may interfere. However, you can prevent the timeout with a keep-alive function. Depending on the situation, you can either configure the SSH server accordingly (which of course requires root privileges) or call SSH with the appropriate parameters right away. In that case, you don’t need any special privileges on either system.
Keep-alive on the server side
### Default keep-alive settings:
$ grep Alive /etc/ssh/sshd_config
#TCPKeepAlive yes
#ClientAliveInterval 0
#ClientAliveCountMax 3
### Edit the SSH server configuration:
$ sudo nano /etc/ssh/sshd_config

### In the end, the relevant lines should look like this:
$ grep Alive /etc/ssh/sshd_config
TCPKeepAlive yes
ClientAliveInterval 60
ClientAliveCountMax 3

### Restart the SSH server once:
$ sudo systemctl restart sshd
Keep-alive on the client side
### Keep the SSH connection alive from the client side
$ ssh -o ServerAliveInterval=60 -o ServerAliveCountMax=1 pi@raspberrypi
In the first case, the setting applies to all users who want to log in to the system via SSH. As a rule, you should therefore only make this change if all users actually need it. Most of the time, though, you only need keep-alive in exceptional cases, so it makes sense to set the option only when needed when calling ssh. For me, this is the case with a web service I can log in to via SSH, for example. If I start long-running backups there, my router terminates the connection before the backup process can report success. With the keep-alive settings mentioned above, however, that’s no longer a problem.



Leave a Reply