
In an earlier article, I described how to back up and restore a Raspberry Pi installation from its memory card – no shit, Sherlock. One question came up again and again, though: the image file ends up exactly as large as the memory card, even if there’s still plenty of free space on it. The “empty” area is more or less packed into the image as well. As a result, the new memory card has to be at least as large as the old one. In addition, an image intended for archiving takes up a lot of storage space. So how do you let the air out of a Raspberry Pi image?
On GitHub, I recently stumbled across the PiShrink script, which does exactly that. The little program takes a Pi image, reduces the partition size to the necessary minimum and also adds a script to the archived system that automatically expands the partition to the maximum available space on the next boot on real hardware. This way, you can quickly shrink the image of a Raspbian system from several gigabytes to a few hundred megabytes – without much effort. You also save time when restoring, since the file system automatically expands to its full size again the first time the Raspberry Pi boots.
$ mkdir ~/bin
$ wget https://raw.githubusercontent.com/Drewsif/PiShrink/master/pishrink.sh -P ~/bin
$ chmod +x ~/bin/pishrink.sh
Since PiShrink is a simple Bash script, installing it isn’t particularly complicated: you just download the script and set the execute permission. Personally, I put scripts like this in the ~/bin directory in my home folder. The system should automatically add this folder to your user’s $PATH, so you can run the command from anywhere without specifying a path. If that’s not the case for you, there are plenty of guides online on extending the environment variable (the linked article refers to Ubuntu, but the procedure is very similar on other distributions).
PiShrink compresses Raspberry Pi images
You should now be able to call the PiShrink script directly in the terminal with a bold pishrink.sh. Without an image, the script merely shows its syntax. In the end, calling it comes down to specifying an image file and, optionally, a second file name if PiShrink should leave the original Raspberry Pi image untouched. If you only specify one file name, PiShrink edits that image directly.
The only switch, -s, matters if you want to shrink the image of a Pi system that isn’t based on Raspbian – for example the Kodi distributions LibreELEC or OpenELEC. More precisely, the switch tells PiShrink not to expand the system automatically on the next boot. To do this, PiShrink normally adds a command to the /etc/rc.local file, which Raspbian runs automatically at boot. However, this file doesn’t exist on LibreELEC (and some other distributions).
### Show PiShrink's help:
$ pishrink.sh
Usage: /home/toff/bin/pishrink.sh [-s] imagefile.img [newimagefile.img]
### Shrink an existing Pi image:
$ sudo pishrink.sh raspberry-pi.img
### Shrink the image and keep the original:
$ sudo pishrink.sh raspberry-pi.img raspberry-pi_pishrink.img
### Disable automatic expansion of the partition:
$ sudo pishrink.sh -s raspberry-pi.img raspberry-pi_small.img
So how does it all come together? As an example, I’m using a current installation of Raspbian Lite on a 16 GB SD card. You insert it into the card reader, determine the device ID with lsblk and then back up the image to the hard disk with dd. The image file then sits on the hard disk as raspberry-pi.img, around 16 GB in size – even though the image is actually mostly empty. Apart from the Raspbian system and a few configuration files, there’s no other data on the system.
$ lsblk
NAME   MAJ:MIN RM   SIZE RO TYPE MOUNTPOINT
[...]
sdd      8:48   1  14.9G  0 disk
├─sdd1   8:49   1    63M  0 part /run/media/[...]/boot
└─sdd2   8:50   1  14.8G  0 part /run/media/[...]/0aed834e-8c8f-412d-a276-a26
$ sudo dd if=/dev/sdd of=~/raspberry-pi.img
15894831104 bytes (16 GB, 15 GiB) copied, 210 s, 75.7 MB/s
31116288+0 records in
31116288+0 records out
15931539456 bytes (16 GB, 15 GiB) copied, 210.459 s, 75.7 MB/s
$ ls -alh ~/raspberry-pi.img
-rw-r--r-- 1 root root 15G Feb 24 21:48 raspberry-pi.img
Then you call PiShrink accordingly – since this is a Raspbian system, I leave out the -s option. PiShrink first copies the image (so make sure there’s enough free space), mounts the copy in a temporary directory under /tmp and then reduces the size of the image: from just under 16 GB originally to only about 1.6 GB. The effect you achieve naturally depends on how much real data was stored on the Raspberry Pi’s SD card.
$ sudo pishrink.sh raspberry-pi.img raspberry-pi_pishrink.img
Copying raspberry-pi.img to raspberry-pi_pishrink.img...
Creating new /etc/rc.local
e2fsck 1.43.4 (31-Jan-2017)
Pass 1: Checking inodes, blocks, and sizes
Pass 2: Checking directory structure
Pass 3: Checking directory connectivity
Pass 4: Checking reference counts
Pass 5: Checking group summary information
/dev/loop2: 35832/959616 files (0.2% non-contiguous), 321790/3872384 blocks
resize2fs 1.43.4 (31-Jan-2017)
resize2fs 1.43.4 (31-Jan-2017)
Resizing the filesystem on /dev/loop2 to 382429 (4k) blocks.
Begin pass 2 (max = 40814)
Relocating blocks             XXXXXXXXXXXXXXXXXXXXXXXXXXXXXXXXXXXXXXXX
Begin pass 3 (max = 119)
Scanning inode table          XXXXXXXXXXXXXXXXXXXXXXXXXXXXXXXXXXXXXXXX
Begin pass 4 (max = 3178)
Updating inode references     XXXXXXXXXXXXXXXXXXXXXXXXXXXXXXXXXXXXXXXX
The filesystem on /dev/loop2 is now 382429 (4k) blocks long.

Shrunk raspberry-pi_pishrink.img from 15G to 1.6G
$ ls -alh raspberry-pi*
-rw-r--r-- 1 root root  15G Feb 27 11:08 raspberry-pi.img
-rw-r--r-- 1 root root 1.6G Feb 27 11:30 raspberry-pi_pishrink.img
Restoring a shrunk Pi image
As a test, the Raspbian system originally installed on a 16 GB SD card is to move to a microSD card with only 8 GB. To do this, I write the image shrunk with PiShrink back to the new card with dd, insert it into the Raspberry Pi and boot the shrunk system. To make full use of the available storage space, the system automatically reboots once during the first boot. After that, you land in the familiar Raspbian system – a df -h shows that the system now uses the entire SD card.
$ lsblk
NAME   MAJ:MIN RM   SIZE RO TYPE MOUNTPOINT
[...]
sdd      8:48   1   7.4G  0 disk
├─sdd1   8:49   1    63M  0 part /run/media/[...]/boot
└─sdd2   8:50   1   7.3G  0 part /run/media/[...]/0aed834e-8c8f-412d-a276-a26
$ sudo dd if=raspberry-pi_pishrink.img of=/dev/sdd bs=1M; sync
1560+1 records in
1560+1 records out
1636684288 bytes (1.6 GB, 1.5 GiB) copied, 116.203 s, 14.1 MB/s
pi@raspberrypi:~ $ df -h
Filesystem Size Used Avail Use% Mounted on
/dev/root 7.2G 990M 6.0G 14% /
devtmpfs 459M 0 459M 0% /dev
tmpfs 463M 0 463M 0% /dev/shm
tmpfs 463M 6.2M 457M 2% /run
tmpfs 5.0M 4.0K 5.0M 1% /run/lock
tmpfs 463M 0 463M 0% /sys/fs/cgroup
/dev/mmcblk0p1 63M 21M 42M 33% /boot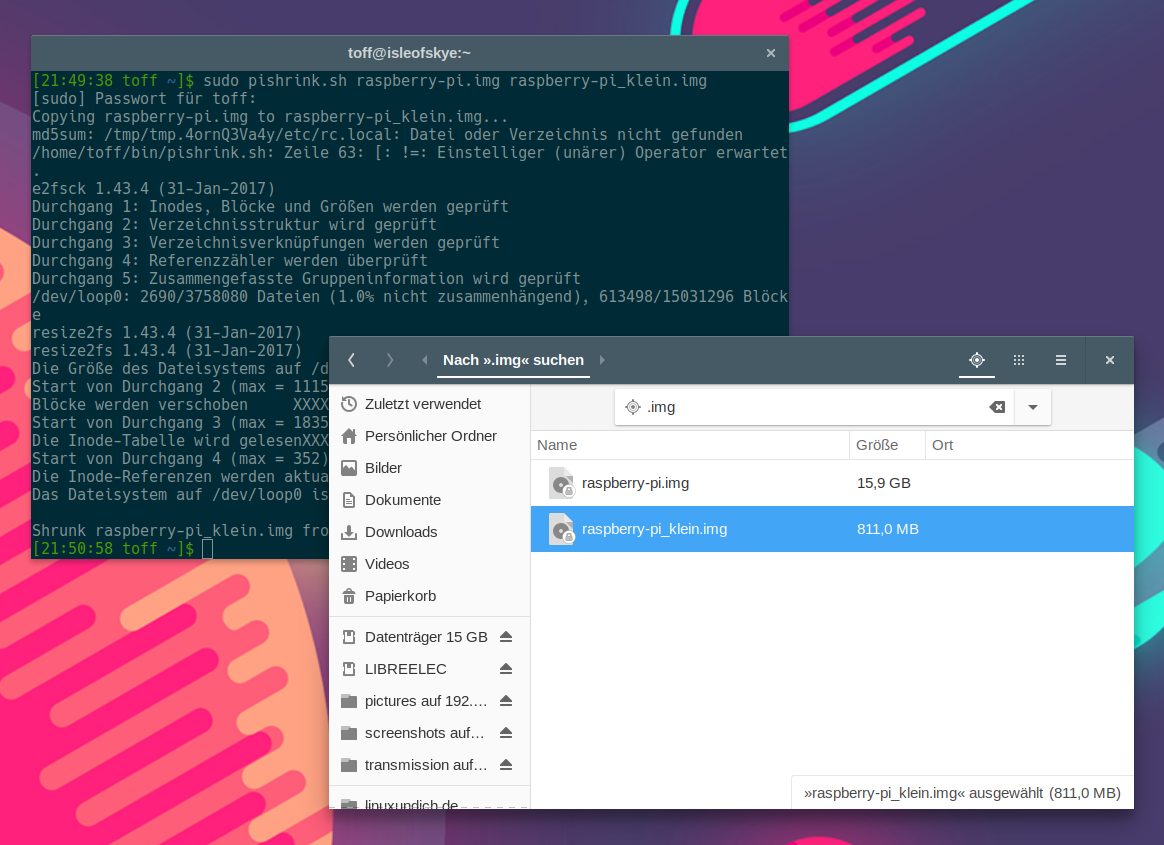
If you back up a Raspberry Pi system that isn’t based on Raspbian and has no /etc/rc.local – such as the Kodi distributions LibreELEC or OpenELEC mentioned above – error messages appear when shrinking it with PiShrink. The reason: by default, PiShrink tries to add a command to this file that later expands the partition automatically. To avoid this, you have to use the -s option. That way, you can shrink the image successfully even without an rc.local.
### Error messages when shrinking a LibreELEC image:
$ sudo pishrink.sh libreelec.img
[...]
md5sum: /tmp/tmp.4ornQ3Va4y/etc/rc.local: No such file or directory
/home/[...]/bin/pishrink.sh: line 63: [: !=: unary operator expected
[...]
### LibreELEC, OpenELEC and co. are better shrunk like this:
$ sudo pishrink.sh -s libreelec.img
Skipping autoexpanding process...
e2fsck 1.43.4 (31-Jan-2017)
/dev/loop2: recovering journal
Pass 1: Checking inodes, blocks, and sizes
Pass 2: Checking directory structure
Pass 3: Checking directory connectivity
Pass 4: Checking reference counts
Pass 5: Checking group summary information
/dev/loop2: 861/1810432 files (1.0% non-contiguous), 252448/7235584 blocks
resize2fs 1.43.4 (31-Jan-2017)
resize2fs 1.43.4 (31-Jan-2017)
Resizing the filesystem on /dev/loop2 to 49976 (1k) blocks.
Begin pass 2 (max = 15759)
Relocating blocks             XXXXXXXXXXXXXXXXXXXXXXXXXXXXXXXXXXXXXXXX
Begin pass 3 (max = 884)
Scanning inode table          XXXXXXXXXXXXXXXXXXXXXXXXXXXXXXXXXXXXXXXX
Begin pass 4 (max = 143)
Updating inode references     XXXXXXXXXXXXXXXXXXXXXXXXXXXXXXXXXXXXXXXX
The filesystem on /dev/loop2 is now 49976 (1k) blocks long.

Shrunk libreelec.img from 7.5G to 563M
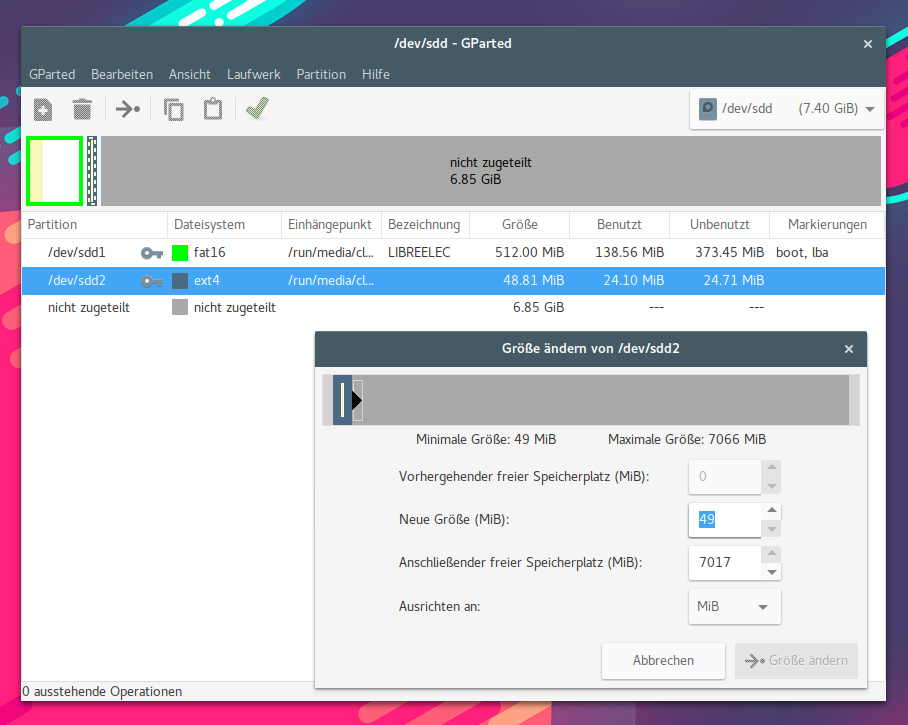
However, the restored system then doesn’t expand automatically, because LibreELEC (and, as far as I know, OpenELEC too) offers no option in its menus to manually expand the data partition to the full card size. The internal resizing routine only kicks in on a freshly copied first installation, as you can see in the script. To make full use of the partition anyway, the only option is to fix it up manually with a partitioning tool such as GParted. On Linux, GParted is readily available; Windows users can use the tool via a live CD or live USB stick.
Leave a Reply